Selecting Points, Segments, Shapes or Groups
In our “simple” project so far we have been able to select shapes and move/rotate them. Here is the part of the code that selects shapes:
//*****************************************
public
boolean mouseDown(Event evt, int x, int y){
xfirst = x; // remember this
point
yfirst = y;
//
Pick a shape
for(int i=0; i<group.numShapes; i++)
if(group.shapes[i].select((double)x, (double)y, 10.)
== true)
System.out.println("Selected =
" + i);
repaint();
return true;
}
Since we have written our whole project in a point-segment-shape-group class structure it should be easy for us to select any path of that structure. All we need to do is go through the levels and extract the class that we want. So for example, if we wanted to select a segment in the above code we need to write:
// Pick a Segment
for(int i=0; i<group.numShapes; i++)
for(int
j=0; j<group.shapes[i].numSegments; j++)
if(group.shapes[i].segs[j].select(
(double)x,
(double)y, 10.) == true)
System.out.println("You got Segment=" + j + " of
shape="+ i);
or to select a point:
// Pick a Point
for(int i=0; i<group.numShapes; i++)
for(int
j=0; j<group.shapes[i].numSegments; j++)
if(group.shapes[i].segs[j].start.select(
(double)x,
(double)y, 10.) == true)
System.out.println("You got Point=" + j + " of
shape="+ i);
The same applies for moving or rotating a point or segment. By arranging the Graphical User Interface we can predict all the possible combinations of move/rotate for group/shape/segment/point to allow the user to interact in any possible way:
//*** Choice setup
transform = new Choice();
transform.addItem("Move");
transform.addItem("Rotate");
transform.addItem("Scale");
//*** Choice setup
whatPart = new Choice();
whatPart.addItem("Select Point");
whatPart.addItem("Select Segment");
whatPart.addItem("Select Shape");
whatPart.addItem("Select Group");
Which will show two choice buttons like this:
![]()
Then we arrange their functionality to select point or segment or shape or group in order to move or rotate or scale correspondingly.
Color Setup
In our “simple” project so far we have been able to select shapes and move/rotate them. But we always assume that all shapes are blue because that is how we define them in the default data members area of each class. If we want to assign a color we need to create a method that will set the color to a specified input color. This should be put within each class. The method is the following:
public void setColor(Color inColor){
color = inColor;
}
The code is the same for all classes (MyPoint to MyGroup). Next we need to draw the object either with its assigned color or red (if selected). So at the level of the MyPoint we need to create a draw point method that will draw a point:
public void draw(Graphics g){
if(isSelected)
g.setColor(Color.red);
else
g.setColor(color);
g.drawRect((int)x, (int)y, 1, 1);
}
We use the drawRect to draw a rectangle 1x1 pixel wide, that is, a point.
At the level of the segment we do the following:
public void draw(Graphics g){
if(isSelected)
g.setColor(Color.red);
else
g.setColor(color);
g.drawLine((int)start.x, (int)start.y, (int)end.x, (int)end.y);
}
At the level of the shape (and the group) we do the following:
public void draw(Graphics g){
if(isSelected)
g.setColor(Color.red);
else
g.setColor(color);
for(int i=0; i<numSegments; i++)
segs[i].draw(g);
}
Now all we need is to setColor to objects and draw them. For example, in the main code (simple) if we want to draw all the shapes green we do:
for(int i=0; i<group.numShapes; i++)
group.shapes[i].setColor(Color.green);
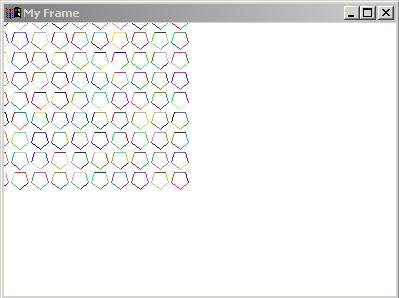
Or if we want to draw the segments random colors we do:
for(int i=0; i<group.numShapes; i++)
for(int j=0; j<group.shapes[i].numSegments; j++)
shape[i].segs[j].setColor(new Color((int)(Math.random()*255.),
(int)(Math.random()*255.),
(int)(Math.random()*255.)));
Here is the result:
Putting all the GUIs in their own window
So far we have been mixing the workspace and the GUIs in the same window. Sometimes the GUIs are placed on top of objects obstructing their view. Wouldn’t it be better if we could put all the GUIs into a floating window so we can move it around in the screen and working uninterrupted in the canvas area? Here is how we do it:
First, we need to create a new window, which we will call “Tools” and where the GUIs will be placed. At this point we are adding all the GUIs to the applet through the statement: applet.add(..). So we need to do a few modifications to the existing MyControl code:
public class MyControl extends
Frame{
Button bexit;
public MyControl(Applet applet){
super("Tools");
setSize(100,200);
setLocation(410, 0);
show();
//*** Button setup
bexit = new Button("Exit");
add(bexit);
}
So we first extend the MyControl to be a Frame object and we construct it by using the super(String title) method, then we set the size, location and show it. We then add any GUI we create (in this case a button) to the MyControl itself and not to the applet. This will produce the following effect (if add more GUIs):

The tools window can be moved and scaled to the user’s convenience.
The next thing we need to do is to transfer the events so that they are processed in the MyControl class. So we simply transfer the action method from simple.java into MyControl.java. The code will be the same except it will be residing in the MyControl class:
//******************************************
public boolean action(Event e, Object o){
if(e.target instanceof Button){
if(e.target==bexit)
System.exit(0);
}
return true;
}
The main code knows about the GUI changes because everything is notified through flags, such as the status variable in MyControl, which is accessed as control.status in the simple class.
Animation
Animation is the sequential display of images. In our previous examples, we have been creating animation by repainting the graphics on every mouse movement. As you can understand, this is a controlled animation. Eventually, we may want to set an object on motion without basing their movement on the user’s mouse. To make things even more complicated, we may want to set a series of objects in motion and control their behavior through a common clock. To do that we need to understand the basics of a computer clock. As we already know, computers have internal clocks that tick extremely (for us) fast, i.e. 500 MHz, which means 500,000,000 ticks per second. Now when we do animation we need to us that clock as a guide of time. Sometimes we also need to keep track of two or more animations as they are deployed in parallel in the scene. For example, in a car race video games there may be your car moving and at the same time other cars that you need to by-pass (not to mention moving obstacles on the road). It seems that these animations are happening in parallel. But practically that cannot happen because then we would need parallel processors, each taking care of one object. Instead, what we do is we divide the processor time in small time sections, called threads, each keeping track of an animated object in the scene. This not too hard to do for the processor since it can take care of 500 million things every second!
The process of dividing the computer’s time in threads is called multi-threading. In Java a Thread is an object that is defined as
Thread myThread = new Thread(this);
The parameter this means that you need to pass it the applet itself in order to create an animation within that applet. Threads take three basic methods start, sleep, and stop.
Now within the applet/application, we need to tell the system when to start an animation and when to stop, in the same way we tell it to look for mouse dragging or action events. This is done through a process called Runnable which the applet needs to implement in order to do animation. Here is the code:
import java.applet.*;
import java.awt.*;
public class simple extends Applet implements Runnable{
Thread MyThread;
int x = 100, y=100;
//********************
public void paint(Graphics g){
g.fillRect(x, y, 20, 20);
x += (int)(Math.random()*10.);
x -= (int)(Math.random()*10.);
y += (int)(Math.random()*10.);
y -= (int)(Math.random()*10.);
}
//********************
public void start(){
MyThread = new Thread(this);
MyThread.start();
}
//********************
public void run(){
while(true){
repaint();
try{
MyThread.sleep(20);
}
catch (Exception e){
;
}
}
}
//********************
public void stop(){
MyThread.stop();
}
}
First, we declare a Thread object called MyThread (we can declare as many as we want). Second, we declare the class to be of type Runnable. This means that we must include three methods start, run, and stop because they are imposed by Runnable (In Java Runnable is called an interface and has three methods which have to be used). So in our case, we need to call the three methods each of which does starts, runs, and stops the thread. Start() creates the thread and starts it, stop() stops the thread and run() runs it. Running a thread means putting it in an infinite loop (while(true)) and within that loop we include the methods or objects we want to animate. The try/catch clauses are there to have the animation slow down using the sleep method. Sleep causes the currently executing thread to sleep for the specified number of milliseconds.
In our case, all we are calling in the run method is repaint that draws a rectangle in a random offset position.
Below is a more general structure of the animation process:
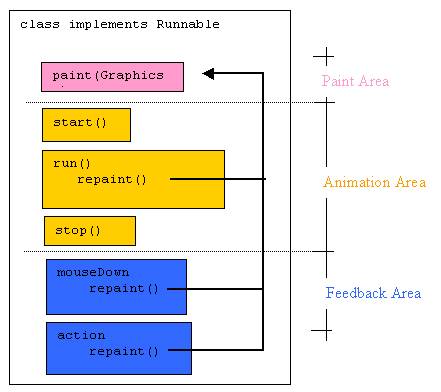
As you can see we can interfere with the animation start/run/stop sequence by calling mouse or GUI commands. So in our previous example we can add the mouseDown method and alter the position of the trembling rectangle:
//********************
public boolean mouseDown(Event evt, int xm, int ym){
x = xm;
y = ym;
return true;
}
Double buffering
When we draw on the screen we use the paint(g) method. Every time we call a graphics method, such as drawRect or drawString, we actually are writing to the screen. Imagine that we have 1,000 lines to draw on the screen and use the following code:
for(int I=0; i<1000; i++)
g.drawLine(10*i, 10*1, 20*i, 20*i);
We are actually sending drawLine commands to the screen 1000 times. This turns out to be an inefficient way of drawing that causes the whole system to delay and the drawing to flicker. To avoid such a problem we do not draw straight to the screen but instead we draw to an image and when done, we display the whole image. This image is also referred to as a buffer. A buffer is a memory area where we store temporary information. So this method of indirect drawing is called double buffering. Here is how it is done:
We create an image, lets call it offscrImg, which serves as a memory area for drawing shapes. This area serves as an in-between area for storing graphical information before they are drawn to the applet's screen. That is, instead of drawing a line and then another line and then another line till we create a polygon we draw all the lines on the offscrImg and when done we copy the whole image to the applet's screen. This is done to make thing faster because every draw to the applet screen takes some time. This method, which is referred to as double buffering, is very useful especially for real-time animation. We first create an Image
Image offscrImg = createImage(400,300); //Set up virtual screen
Graphics offscrG = offscrImg.getGraphics(); // Get a graphics context
In the paint method we draw to the off screen graphics and when dome we draw in the image. The image and the graphics are associated, so any drawing on the offscrG is by association drawn to the offscrImg. So our paint method will look like this:
public void paint(Graphics g) {
for(int I=0; i<1000; i++)
offscrG.drawLine(10*i, 10*1, 20*i, 20*i); // draw virtually
g.drawImage (offscrImg,0,0,this);
}
The result is more stable graphics and less flickering.
Images
An image, in Java, is an array of pixels. A pixel is represented in java as an integer number. So an image is an array of integer numbers. As we have seen in the beginning of this book, an integer number is composed of 32 bits. So Java uses those 32 bits to store information about the pixel’s color. Specifically, the first eight bits are for the degree of transparency (also called alpha channel), the next eight for red, the next eight for green, and the last eight for blue. Schematically, it lloks like this:

To get access to a color (receive or change) we need to do manipulations on the bit level to extract the proper 8 bits. This is done through bit-manipulation methods provided by java. In brief they work as follows. Suppose we have a pixel called myPixel.
int myPixel;
int alpha =( myPixel & 0xff000000)>>24;
int red =( myPixel & 0xff0000)>>16;
int green =( myPixel & 0xff00)>>8;
int blue =( myPixel & 0xff);
The variables alpha, red, green, and blue contain the corresponding values fir that pixel. [FYI, the java code does the following: to get the value of red we AND (symbol &) with the hexadecimal number oxff0000 and then we shift the bit by 16 positions. That will return only the second group of 8-bits that holds the value of red. ]
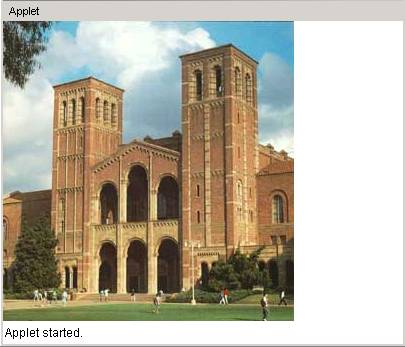
Now reading in an image in Java is very simple. Java has built-in methods that read .gif and .jpg image file formats. The method is:
Image myImage = getImage(getCodeBase(), "royce.jpg");
where getCodeBase() is the URL of where the code is. If the image called Royce.jpg is in the same directory as the code we pass it as the string "royce.jpg". The following code will read an image and display it.
import java.applet.*;
import java.awt.*;
import java.awt.image.*;
public class MySimpleImage extends Applet {
Image myImage;
//********************
public void init(){
myImage = getImage(getCodeBase(), "royce.jpg");
}
//********************
public void paint(Graphics g){
g.drawImage(myImage, 0, 0, this);
}
}
The result is:
In order to process the pixels of an image we need to place them in an array (which we will call pixels[]). This is done through a method call PixelGrabber. We also need to wait for all the image to be opened through the method waitToOpenImage. Here is the code:
import java.applet.*;
import java.awt.*;
import java.awt.image.*;
public class MyImage extends Applet {
int width;
int height;
int[] pixels;
Image myImage;
//********************
public void init(){
myImage = getImage(getCodeBase(), "royce.jpg");
getThePixels(myImage);
gray();
myImage = showImage();
}
//*****************************
public void getThePixels(Image picture)
{
waitToOpenImage(picture);
width=picture.getWidth(this);
height=picture.getHeight(this);
pixels=new int[width*height];
PixelGrabber pg=new
PixelGrabber(picture,0,0,width,height,pixels,0,width);
try
{
pg.grabPixels();
} catch (InterruptedException e){
System.out.println("Cannot open Pixels");
}
}
//****************************
void waitToOpenImage(Image picture)
{
MediaTracker tracker=new MediaTracker(this);
tracker.addImage(picture,0);
try
{
tracker.waitForID(0);
} catch (InterruptedException e){
System.out.println("Cannot wait for picture");
}
}
//****************************
void invert()
{
for(int index=0;index<width*height;index++)
pixels[index]=pixels[index]^0xffffff;
}
//****************************
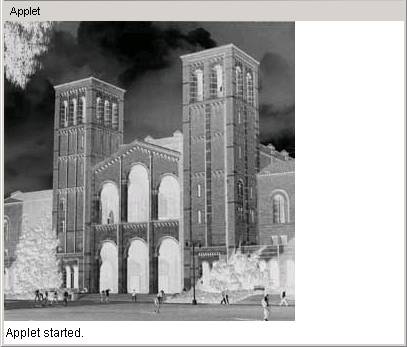
void gray()
{
for(int index=0;index<width*height;index++)
{
int c=pixels[index];
int r=(c&0xff0000)>>16;
int g=(c&0xff00)>>8;
int b=(c&0xff);
int gray=Math.min(255, (r*3+g*4+b*2)/9);
pixels[index]=(c&0xff000000)+(gray<<16)+(gray<<8)+gray;
}
}
//****************************
public Image showImage()
{
return createImage(new
MemoryImageSource(width,height,pixels,0,width));
}
//********************
public void paint(Graphics g){
g.drawImage(myImage, 0, 0, this);
}
}
The result is this:
Screen Setup (Pan-Zoom-snap)
Coming soon
Curves
Coming soon
Networking
Coming soon