22.1. More GUIs (Choice, Label, and TextField)
A Choice is a pull-down menu. In a Choice object, you can select from a list of choices only one at a time. We will create one with three choices (Move, Rotate, and Scale) instead of the three buttons we used earlier. Here is the code:
Choice transform; //definition
//*** Choice setup
transform = new Choice();
transform.addItem("Move");
transform.addItem("Rotate");
transform.addItem("Scale");
applet.add(transform);
We first define the object
then we allocate memory, then add the items of choice and finally add the
object to the applet. In order to get feedback, we use the following code:
public void
doButtons(Event e, Object o){
if(e.target instanceof Choice){
if(o.equals("Move"))
status = MOVE;
else if(o.equals("Rotate"))
status = ROTATE;
else if(o.equals("Scale"))
status = SCALE;
}
}
The label and the TextField are created sin a similar way:
Label
coordsDisplay; //definition
TextField input;
//definition
//*** Label setup
coordsDisplay = new Label();
//*** TextField setup
input = new TextField("Welcome");
//*** Applet setup
applet.add(coordsDisplay);
applet.add(input);
and the TextField feedback looks like:
if(e.target instanceof TextField){
System.out.println("textfield = " +
input.getText());
}
22.2. Arranging
GUI objects on the screen
By default newly created UI objects are arrange sequentially on the screen starting from the top center. This is done because by default every applet (or application) has a method called setLayout that is responsible for setting the UI elements in rows. If we set the setLayout to null (the default is FlowLayout) then we can arrange things on our own:
applet.setLayout(null);
If we do that then we have to control the position and size of each element. This is done individually for every element using their setSize and setLocation methods:
transform.setLocation(0, 60);
transform.setSize(100, 40);
In the following code we create four UI elements and we control their size and location:
import java.applet.*;
import java.awt.*;
public class MyControl {
public final int MOVE = 0;
public final int ROTATE = 1;
public final int SCALE = 2;
public int status = MOVE;
Button bexit;
Choice transform;
Label coordsDisplay;
TextField input;
public MyControl(Applet applet){
//*** Button setup
bexit = new Button("Exit");
bexit.setLocation(0, 0);
bexit.setSize(40, 20);
//*** Label setup
coordsDisplay = new Label();
coordsDisplay.setLocation(0, 20);
coordsDisplay.setSize(80, 20);
//*** TextField setup
input = new TextField("Welcome");
input.setLocation(0, 40);
input.setSize(80, 20);
//*** Choice setup
transform = new Choice();
transform.addItem("Move");
transform.addItem("Rotate");
transform.addItem("Scale");
transform.setLocation(0, 60);
transform.setSize(100, 40);
//*** Applet setup
applet.setLayout(null);
applet.add(transform);
applet.add(coordsDisplay);
applet.add(input);
applet.add(bexit);
}
//******************************************
public void doButtons(Event e, Object o){
if(e.target instanceof Button){
if(e.target==bexit)
System.exit(0);
}
else if(e.target instanceof Choice){
if(o.equals("Move"))
status = MOVE;
else if(o.equals("Rotate"))
status = ROTATE;
else if(o.equals("Scale"))
status = SCALE;
System.out.println("status = " + status);
}
else if(e.target instanceof TextField){
System.out.println("textfield = " + input.getText());
}
}
//****************************************
public void showMouseCoords(int xmouse, int ymouse){
coordsDisplay.setText("x=" + xmouse + " y=" +
ymouse);
}
}
The last method called showMouseCoords is connected with the main code where we add it within the mouseMove method:
//*****************************************
public boolean mouseMove(Event evt, int x, int y){
control.showMouseCoords(x, y);
return true;
}
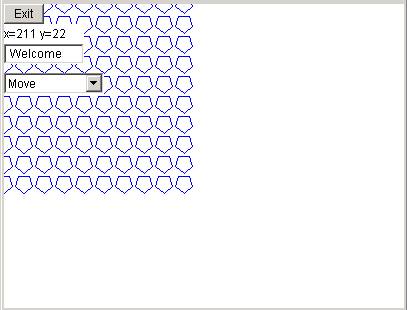
The result of these GUIs are shown below:
There are more GUI elements such as RadioButton, and CheckBox that you are encouraged to look and try.
23.
File import/export
A file is collection of data that we can store and/or recall at any time. The collected data in a file represent a set of objects. In our case, we would need to create a file where we can store all the point, segment, shape, and group data in order to work with them later. We will be storing them using our own hierarchical way by looping through all the groups, all the shapes, all the segments and all the points and storing the x and y coordinates. The way that we store/retrieve the data is referred to as file format. In our case, our file format (which we can also call native) is a simple hierarchy that leads to x and y coordinates. In other case, such as DXF they have a different more complicated way of saving/retrieving data. We will show how to write/read data in a native format (our own) and how to write/read using the specification of the international DXF format.
24.1 Native File Write
In java, to create a file we need to need to create a FileOutputStream. This create a file with the name you want, i.e. output.txt. Then we use that object to create a DataOutputStream object that we use to write out that data using its writeXX methods:
FileOutputStream
file = new FileOutputStream(fileOut);
DataOutputStream stream = new DataOutputStream(file);
Once we created the DataOutputStream we then loop through our data structures and write out the data in the order that we loop:
stream.writeUTF("Kostas Format"); // file identifier
stream.writeInt(group.numShapes);
for(int k=0;
k<group.numShapes; k++){
stream.writeInt(group.shapes[k].numSegments);
for(int j=0; j<group.shapes[k].numSegments; j++){
stream.writeDouble(group.shapes[k].segs[j].start.x);
stream.writeDouble(group.shapes[k].segs[j].start.y);
stream.writeDouble(group.shapes[k].segs[j].end.x);
stream.writeDouble(group.shapes[k].segs[j].end.y);
}
}
The first write statement is a simple String that we will use later as an identifier. We use the writeUTF method that basically writes out Strings in the UTF (international) format. Then as we loop we write the number of shapes and segments using the writeInt since they are integers and the writeDouble for the x and y points.
When done we close the file through the statement:
file.close();
23.2. File
Exceptions
Now, during the writing process things can happen, such as memory failure, power break, operating system errors, etc. To protect the file writing process, Java forces the programmer to write the file processing code within blocks that will handle operating system problems. This is done through the java code arrangement:
try{
. .
.
}
catch(IOException ioe){
. .
.
}
The IOException is a java object that resides in the package java.io.* and therefore should be imported. In addition the method that uses IOExceptions need to notify everybody that an IO problem may be thrown and therefore we use a throes EOException in the method definition.
Notice: All Exceptions (network problems, multimedia problems, etc.) are handled the same way using throws, try, and catch commands.
So our file write method code will look like this:
//*********************************************************
void writeNativeFile(MyGroup
group, String fileOut) throws IOException
{
System.out.println("Writing fileOut = " + fileOut +
"...");
FileOutputStream file = new FileOutputStream(fileOut); // file creation
DataOutputStream stream = new DataOutputStream(file); // data stream to write
try {
stream.writeUTF("Kostas Format"); // file identifier
stream.writeInt(group.numShapes);
for(int k=0; k<group.numShapes; k++){
stream.writeInt(group.shapes[k].numSegments);
for(int j=0; j<group.shapes[k].numSegments; j++){
stream.writeDouble(group.shapes[k].segs[j].start.x);
stream.writeDouble(group.shapes[k].segs[j].start.y);
stream.writeDouble(group.shapes[k].segs[j].end.x);
stream.writeDouble(group.shapes[k].segs[j].end.y);
}
}
file.close();
}
catch(IOException e) {
System.out.println("File problems!!");
System.exit(1);
}
}
23.3. Native
File Read
To read a native format file we need to follow similar steps to the write process. We create a file and stream, loop to read and then close the file. The method takes a filename input as a parameter and will return a group (made from whatever it reads). Here is the code:
//*********************************************************
public MyGroup readNativeFile(String fileIn) throws
IOException
{
System.out.println("Reading fileOut = " + fileIn);
FileInputStream is = new FileInputStream(fileIn);
DataInputStream file = new DataInputStream(is);
try{
//*** Check to see if its of Kosta's native file
format
String name = file.readUTF();
if(name.equals("Kostas Format")==false){
System.out.println("File format not
recognized: " + name);
return null;
}
// loop to read the data
MyGroup group;
int numShapes = file.readInt();
MyShape shapes[] = new MyShape[numShapes];
for(int k=0; k<numShapes; k++){
int numSegments = file.readInt();
MySegment segs[] = new MySegment[numSegments];
for(int j=0; j<numSegments; j++){
double
x1 = file.readDouble();
double y1 = file.readDouble();
MyPoint start = new MyPoint(x1, y1);
double x2 = file.readDouble();
double y2 = file.readDouble();
MyPoint
end = new MyPoint(x2, y2);
segs[j] = new MySegment(start, end);
}
shapes[k] = new MyShape(numSegments, segs);
}
group = new MyGroup(numShapes, shapes);
//**** Finish
file.close();
return group;
}
catch(IOException e) {
System.err.println("File problems!!" );
System.exit(1);
}
return null;
}
The first thing we do is to open a file and a stream. Them we check to see whether this is a valid native format by reading the first line and comparing it with the string “Kostas Format”. If it is not equal we print an error statement and return nothing:
String name =
file.readUTF();
if(name.equals("Kostas Format")==false){
System.out.println("File format not
recognized: " + name);
return null;
}
Then we proceed to loop and read all the way to the x and y coordinates. The last line after the loops is:
group = new
MyGroup(numShapes, shapes);
which means that at that point we gather enough information to create a group.
When done we close the file and return the newly created group object.
23.4. The
DXF File Format
DXF (Drawing Interchange Format) is an international convention of how 2D and 3D graphics files should be written. It was developed originally by a company called AutoDesk, the one that produces the program called AutoCAD, to allow the interchange of drawings between AutoCAD and other programs. DXF files are text files (also called ASCII files) that can be opened in any text editor to view. They have the .dxf extension to be identified. If we open a DXF file we will notice a series of code names and numbers. The code names represent the entities involved in saving, such POLYLINE, VERTEX, and others and the numbers represent actual data such as dimensions or coordinates. A code is a word that means something but it can also be a number between 0-999 that means something (in the dxf specifications): for example, 8 means layer, 10 means x-coordinate, 62 means color, and 999 means comments. After a code number follows that data. For example if after 10 follows 5.2245 that means that 5.2245 is the x coordinate. For more information on dxf codes read the dxf help at http://www.cda.ucla.edu/caad/Class_Notes/227B/fileio/R13DXF.HLP.
Here is a simplified version of a DXF file:
SECTION
ENTITY
POLYLINE
8
layer_1
66
1
70
9
62
183
0
VERTEX
8
layer_1
62
183
10
-39.995230
20
64.686858
30
0.000000
70
32
0
SEQEND
ENDSEC
EOF
DXF has its own way of representing 2D (and 3D) objects. A simple DXF file represents geometry with polylines and vertices. A polyline will start with the code POLYLINE and will end with the code SEQEND. In-between there will be many VERTEX words each one followed by 10, 20, and 30 codes which mean x, y, and z coordinates. The whole file will start with the name SECTION, which refers to its geometry section (as opposed to the screen setup section) and ends with an ENDSEC, which means end of section. Finally the whole DXF file will end with the word EOF that means end of file.
To write a dxf file we need to write all the above information in sequence in a file. First we need to open a file and stream to write sequentially characters to a file. Then we loop and use the writeBytes method to write the shape-point information as polyline-vertex sequences (in the form of ASCII text):
/*********************************************************/
void writeDXFFile(MyGroup
group, String filename) throws IOException
{
System.out.println("Writing file " + filename +
"...");
FileOutputStream file = new FileOutputStream(filename);
DataOutputStream stream = new DataOutputStream(file);
try {
stream.writeBytes("999\r\n");
stream.writeBytes("Kostas dxf output\r\n");
stream.writeBytes(" 0\r\n");
stream.writeBytes("SECTION\r\n");
stream.writeBytes(" 2\r\n");
stream.writeBytes("ENTITIES\r\n");
stream.writeBytes(" 0\r\n");
// for shapes
for(int k=0; k<group.numShapes; k++){
stream.writeBytes("POLYLINE\r\n");
stream.writeBytes(" 8\r\n"); //layer
stream.writeBytes("layer_1\r\n");
stream.writeBytes(" 66\r\n");
stream.writeBytes(" 1\r\n");
stream.writeBytes(" 70\r\n");
stream.writeBytes(" 9\r\n");
stream.writeBytes(" 62\r\n"); // color
stream.writeBytes(" 183\r\n");
stream.writeBytes(" 0\r\n");
// for points
for(int j=0; j<group.shapes[k].numSegments;
j++){
stream.writeBytes("VERTEX\r\n");
stream.writeBytes("10\r\n"); // x
stream.writeBytes(Double.toString(
group.shapes[k].segs[j].start.x)
+"\r\n");
stream.writeBytes(" 20\r\n"); // y
stream.writeBytes(Double.toString(
group.shapes[k].segs[j].start.y)+"\r\n");
stream.writeBytes(" 30\r\n"); // z
stream.writeBytes(Double.toString(0.0)+"\r\n");
stream.writeBytes(" 70\r\n");
stream.writeBytes(" 32\r\n");
stream.writeBytes(" 0\r\n");
}
stream.writeBytes("SEQEND\r\n");
stream.writeBytes(" 0\r\n");
}
stream.writeBytes("ENDSEC\r\n");
stream.writeBytes(" 0\r\n");
stream.writeBytes("EOF\r\n");
//*** Finish
stream.flush();
stream.close();
}
catch(IOException e) {
System.err.println("Problems writing file!!"
);
}
}
The part of the string that
looks like \r\n means carriage return and new line feed. They are used to make the dxf file more
readable. The statement
Double.toString(group.shapes[k].segs[j].start.x)
+"\r\n");
converts a double value into a string (to be written out).
14.5. Reading
DXF Files
Reading a DXF file is more complex than writing because we do not know how many points-shapes we will encounter in advanced in order to pre-allocate the appropriate memory for the arrays. This problem is similar to that of a butterfly hunter: think of an explorer with jars that collects butterflies. S/he does not know how many jars to have in advanced because s/he does not know how many butterflies s/he will catch. So s/he starts with a number of jars and if s/he runs out of jars goes and gets more. The similar case here is with points. Java recognizes the difficulty in predicting and therefore provides a dynamic array object called Vector. A Vector can add elements on the fly and remove them. When we are done, we simply copy the vector to the array.
Vector
vshapes = new Vector();
.
. .
if ("POLYLINE".equals(st.sval)){
MyShape shape =
processPOLYLINE(st);
vshapes.addElement(shape);
}
Once we are sure we have found all our shapes and add them into the vector, we then need to allocate memory for as many shapes we found (=the size of the vector) and copy the shapes from the vector:
int numShapes = vshapes.size();
MyShape[] shapes = new MyShape[numShapes];
for(int i=0; i<numShapes; i++)
shapes[i] = (MyShape)vshapes.elementAt(i);
MyGroup group = new MyGroup(numShapes, shapes);
The (MyShape) in the statement
(MyShape)vshapes.elementAt(i);
is needed to cast the element of the vector into a MyShape. Vectors can allocate memory dynamically for any kind object. To extract the object we only need to cast it out.
So this is the way to add shapes. In the same way we add points.
Now that we solved the problem of allocating memory for our arrays we can start reading the file. First we tokenize the file, that is, we break it into words.
StreamTokenizer
st = new StreamTokenizer(is);
A word is not always whatever is surrounded with white spaces (blanks). The word space_one is also one word so we need to tell the tokenizer that underscore is part of a word. This is done through the statement:
st.wordChars('
','_');
We are also telling the tokenizer that and end of line is significant because will need it later as we search. This is done by the statement:
st.eolIsSignificant(true);
Then we start looping and looking for words. This is done by using a while(true) loop. A while(true) loop will go forever until a break statement is found. In our case, a break will be given when we reach the end of the file (EOF).
Now as we search we are looking for specific keywords one of which is POLYLINE, because that signifies the beginning of a shape. This is done by using the case structure and looking for TT_WORD type tokens.
case
StreamTokenizer.TT_WORD:
if
("POLYLINE".equals(st.sval)){
The tokenizer will return sval values back (String values) and we compare them to the string “POLYLINE”. If we run into the word POLYLINE we call the processPOLYLINE method. This, of course, will return a MyShape object.
When done processing we close the file and return back to the main program (simple).
Here is the code:
/**********************************************************/
public MyGroup readDXFFile(String fileIn) throws IOException
{
Vector vshapes = new Vector();
System.out.println("Reading DXF file " + fileIn +
"...");
FileInputStream is = new FileInputStream(fileIn);
DataInputStream file = new DataInputStream(is);
StreamTokenizer st = new StreamTokenizer(is);
st.eolIsSignificant(true);
st.wordChars(' ','_');
boolean exit = false;
//flag to exit
while (true) {
if(exit) break; // exit valve
st.nextToken();
switch (st.ttype) {
case StreamTokenizer.TT_EOF:
exit = true;
break;
case StreamTokenizer.TT_WORD:
if
("POLYLINE".equals(st.sval)){
MyShape
shape = processPOLYLINE(st);
vshapes.addElement(shape);
}
break;
default:
break;
} /* switch */
} /* while */
System.out.println("Finished ");
int numShapes = vshapes.size();
MyShape[] shapes = new MyShape[numShapes];
for(int i=0; i<numShapes; i++)
shapes[i] = (MyShape)vshapes.elementAt(i);
MyGroup group = new MyGroup(numShapes, shapes);
file.close();
return group;
}
Now the burden of finding the x and y points is done in the method processPOLYLINE which returns a MyShape object. Here is the code:
/********************************************************************/
private MyShape
processPOLYLINE(StreamTokenizer st) throws IOException {
double x=0.,y=0.;
double tempx=0., tempy=0.;
Vector vpoints = new Vector();
boolean first = true;
boolean vertex_found = false;
first = true;
vertex_found=false;
while(true)
{
st.nextToken();
if ("VERTEX".equals(st.sval)){
vertex_found=true;
}
if
("AcDbFaceRecord".equals(st.sval)){
// this is for formZ
vertex_found=false;
}
if
("SEQEND".equals(st.sval)){
// add the first point
vpoints.addElement(new MyPoint(tempx, tempy));
first = false;
vertex_found = false;
break;
}
if (st.nval == 10 &&
vertex_found==true) {
if(st.nextToken() ==
StreamTokenizer.TT_EOL)
if (st.nextToken() == StreamTokenizer.TT_NUMBER)
x = st.nval;
}
if (st.nval == 20 &&
vertex_found==true) {
if(st.nextToken() ==
StreamTokenizer.TT_EOL)
if (st.nextToken() ==
StreamTokenizer.TT_NUMBER)
y = st.nval;
// to keep the first point to add
later in the segment
if(first == true &&
vertex_found==true){
tempx = x;
tempy = y;
first = false;
}
vpoints.addElement(new MyPoint(x, y));
}
/* if (==20)*/
}
/* while */
// create a shape out of the vector
int numSegments = vpoints.size()-1;
MySegment[] segs = new
MySegment[numSegments];
for(int i=0; i<numSegments; i++)
segs[i] = new
MySegment((MyPoint)vpoints.elementAt(i),
(MyPoint)vpoints.elementAt(i+1));
MyShape shape = new MyShape(numSegments,
segs);
return shape;
}
What we are doing here is similar to the shape search, except here we are looking for the “VERTEX” and (if we find it), we look for the words “10” and “20”, which correspond to x and y coordinates. These 10s and 20s should be followed by double numbers which hold the values of x and y coordinates.
When we find a 10-20 pair we add it to the vector. If it is the first point we save in tempx and tempy because we need it later to connect the last point with the first to close the shape.
Once we find the string “SEQEND”, that means that we are done with the shape and we need to add the first point and then exit the loop.
if
("SEQEND".equals(st.sval)){
// add the first point
vpoints.addElement(new
MyPoint(tempx, tempy));
first = false;
vertex_found = false;
break;
}
Upon exiting the loop, we copy the vector to the array shapes and then return it:
// create a shape
out of the vector
int numSegments = vpoints.size()-1;
MySegment[] segs = new
MySegment[numSegments];
for(int i=0; i<numSegments; i++)
segs[i] = new
MySegment((MyPoint)vpoints.elementAt(i),
(MyPoint)vpoints.elementAt(i+1));
MyShape shape = new MyShape(numSegments,
segs);
//shape.print();
return shape;
To invoke the DXF read/write methods from the main code we simply need to add the following statements:
file.writeDXFFile(group,
"out.dxf");
or
group = file.readDXFFile("out.dxf");
Here is the result (for a Graves.dxf building drawn in formZ and saved as dxf):
